eClass offers a variety of assignment configuration settings in order to help you control every aspect of assignment submissions, including release & end dates, access restrictions and other options. Student submissions, grading and instructor feedback can also be added, creating an all-inclusive assessment activity.
Adding an Assignment to your Course
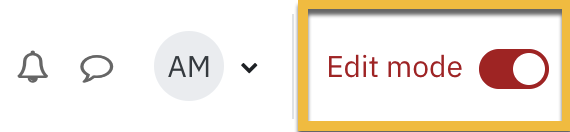
- Click Edit mode toggle to turn it on located upper right corner of the course homepage
- Click the + add content button and select Activity or resource in the section where you would like the assignment to be listed.

- In the Add an activity or resource pop-up menu, select the Assignment activity, then click the Add button at the bottom right of the menu.
-
 In the proceeding settings page for the Assignment activity, click Expand all (top right of the settings page) to expand each of the sections and reveal the options.
General
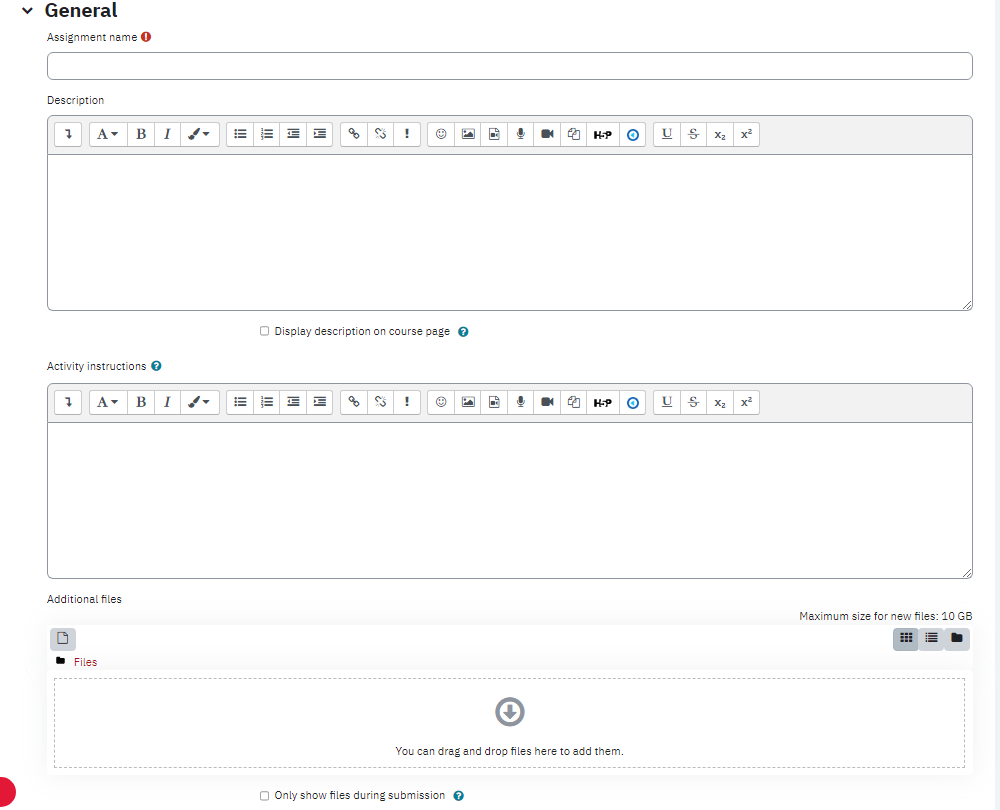
- Enter the assignment title in the Assignment name field. This name will appear as a link to access the Assignment on the course main page.
- Enter a brief description about the assignment in the Description text box.
The box can be expanded by clicking and dragging the bottom right corner outwards. To make more editing options available, click the ellipsis button to expand the toolbar.
- Place a check-mark next to Display description on course page check-box to make it visible on the course home page. The description will display directly below the activity link and on the Assignment page.
- The Activity instructions box can be used to enter instructions that students need to follow once they click the assignment activity on the course page.
- Documents and files for students to reference can be placed in the Additional files field.
- Place a check-mark next to Only show files during submission check-box to make the additional files visible only on the assignment submission page.
Availability
Availability limits when students can submit assignments. If dates are not required, make sure to remove the checkmarks from the Enable check boxes. Otherwise, follow the instructions below to add submission dates.

- Select the submission start date and time from the Allow submissions from drop-down lists.
- Select the assignment due date from Due date drop-down lists.
- Select the date and time beyond which assignment submissions will not be accepted from the Cut-off date drop-down lists.
- Select date and time by when you expect the marking of the submission completed from Remind me to grade by drop-down lists. This adds notifications on your dashboard and as well as in your Calendar and Course overview block, when at least one student has submitted.
Submission Types
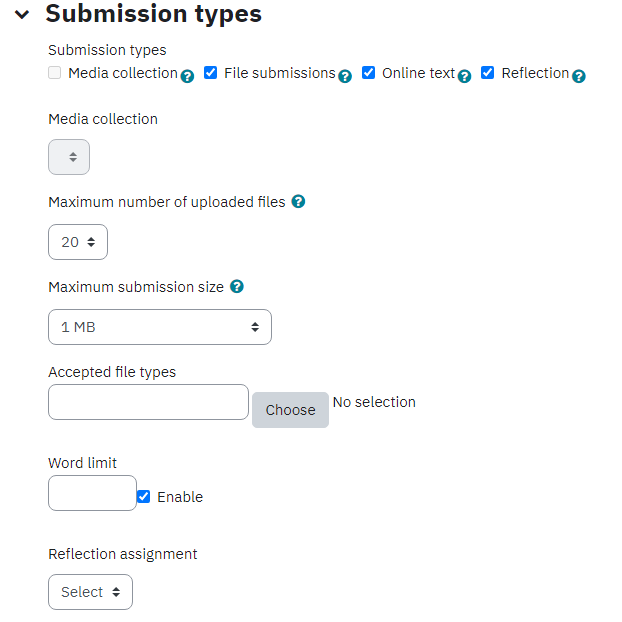
- Choose the appropriate setting from the Submission Typessection to create one of the following assignment types:
- Media collection allows students to submit their Media collection gallery you have setup in the course as assignment submission.
-
File submissions allows each student to upload one or multiple files dependent on the maximum number of uploaded files set by the teacher.
- Click on the Choose button beside the Accepted file types box to select what file types students can submit
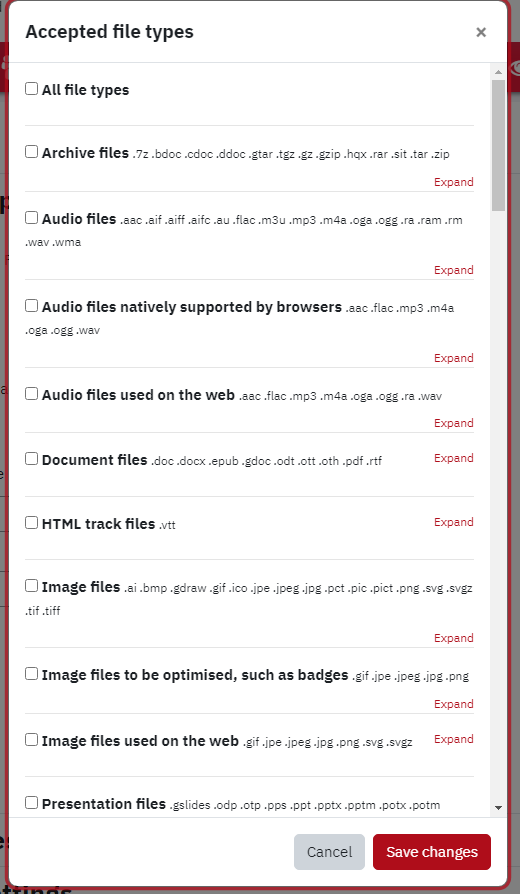
- Click on the Choose button beside the Accepted file types box to select what file types students can submit
-
Online text allows students to enter the assignment text in the text window directly (they can also paste it in here).
- Click the Enable checkbox beside the Word limit field to set what the word limit for a student submission should be. This setting does not set a hard limit on the number of words, rather, it shows a running total of words for the student to gauge the length of their assignment.
- Select the relevant Maximum number of uploaded files allowed for this assignment from the drop-down list. Increasing this number will allow students to submit multiple files, for example a document and a media file.
- Select an appropriate size limit for each uploaded file from the Maximum submission size drop-down list. The default (and recommended) limit is 100MB.
Feedback Types
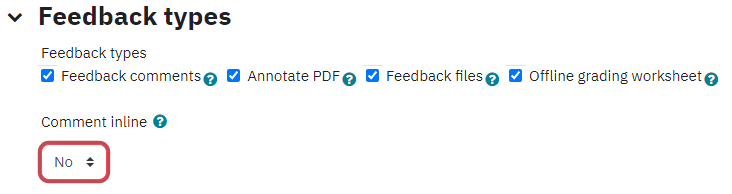
- Select the preferred Feedback types to determine how you will provide feedback to students on the assignment.
-
Feedback comments allows the marker to write comments directly into a text box in eClass.
- Changing the Comment inline field to Yes will allow grader comments to be displayed inline with the submission
- Annotated PDF allows markers to create annotated PDF files when marking assignment submissions. This will allow you to add comments, drawings etc., directly on top of the submissions.
- Feedback files allows the marker to upload files with feedback including a marked up assignment, a text document, an audio feedback file or other type of file.
- Offline grading sheet allows markers to upload a worksheet containing student grades.
-
Feedback comments allows the marker to write comments directly into a text box in eClass.
Submission Settings
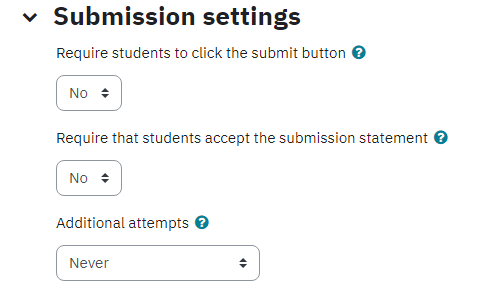
- Select the preferred setting from the Require students to click submit button drop-down list.
- Yes forces the student to declare the submission as final. Students are able to upload and make changes to submissions until they choose to submit. As the teacher, you will see any uploaded files in the Gradebook, but the submission status will indicate either draft or submitted for grading.
-
No allows the student to edit the submission at any time until the cut-off date.
- Select Yes from the Require that students accept the submission statement drop-down list if you would like students to declare the originality of their work.
- Select the preferred setting from the Additional attempts drop-down list. This setting allows a student to resubmit an assignment after it has been graded.
- Never: the submission cannot be reopened.
- Manually: the submission can be reopened manually by a teacher on the grading page for an individual student.
-
Automatically until pass: the submission is automatically reopened until the student achieves a passing grade (as set in the Grade settings).
Select the Maximum attempts for re-submission from the drop-down list.
Group Submission Settings
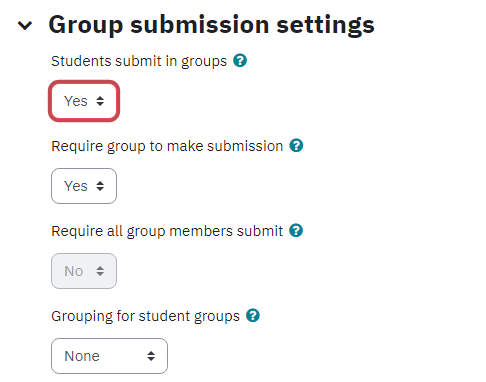
- Select Yes from the Students submit in groups drop-down list if you want to create a group assignment.
- Select Yes from the Require group to make submission drop-down list if you would NOT like non-group members to submit.
- Select Yes from the Require all group members submit drop-down list if you would like everyone in a group to click submit before the submission is considered final.
- Select the appropriate group from the Grouping for student groups drop-down list if relevant.
Notifications
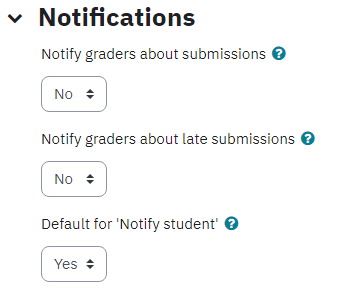
- Select Yes from the Notify graders about submissions drop-down list if you would like to receive an e-mail notification each time an assignment is submitted.
- Select Yes from the Notify graders about late submissions drop-down list if you would like to receive an e-mail notification each time an assignment is submitted late.
- Select Yes from the Default settings for "Notify students" if you would to send notification to students by default from the grading form when any feedback or grades is given. Note that once the notification is sent, any subsequent changes to the feedback or grades will not send notification a second time.
Grade
- Select the grading type from the Grade drop-down list. You can choose from None, Scale and Point. Selecting Scale or Point will allow you to select a Maximum grade you want to grade out of.
Be careful not to change the grade settings of an assignment with existing submissions. Doing so will reset the grading for the assignment and consequently remove any grades you have entered thus far.
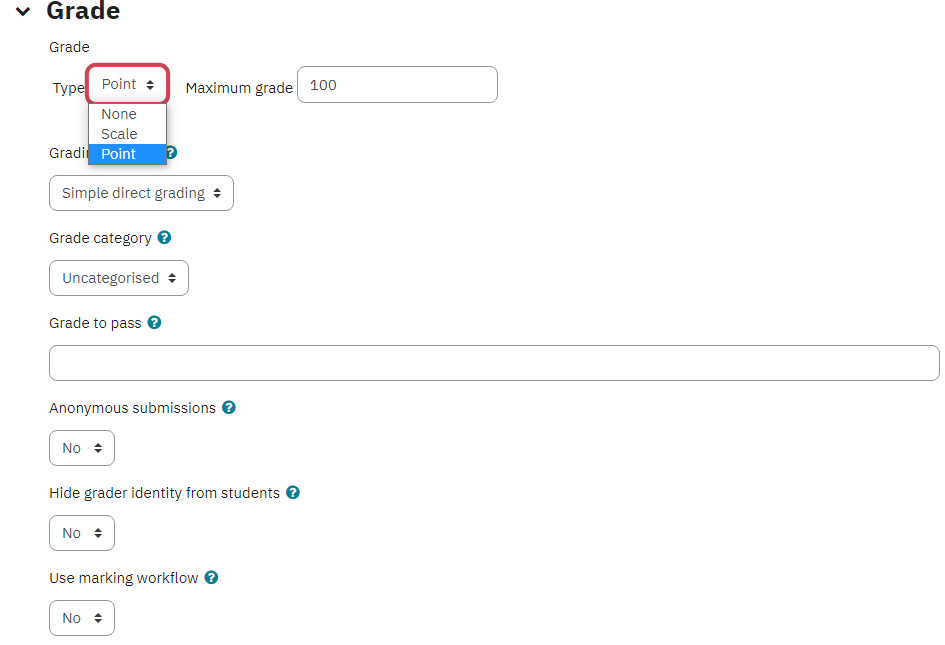
- Select the Grading method from the drop-down list.
- Simple direct grading allows you to enter a grade for the assignment.
- Marking guide allows you to provide a comment and a mark up to a maximum for each criteria you defined in the marking guide.
-
Rubric allows you to build a rubric within the assignment with various levels and criterion for grading.
- Select a Grade category from the drop-down list if you have set up categories to organize your grade items.
- Enter the minimum grade required to pass in Grade to pass. This is used in activity and course completion (if used) and highlights pass/fail marks in the Gradebook.
- Select Yes from the Anonymous submissions drop-down list if you would like to hide the identity of the students during the grading process.
- Select Yes from the Hide grader identity from students drop-down list to hide the identity of the marker from your students.
- If you would like to enable marking workflow, select yes from the Use marking workflow drop-down list. The marking workflow creates a column in the assignment to show the grading status of assignments. This is particularly useful if multiple markers are involved in the grading.
- If you would like to be able to assign specific markers to submissions, select yes from the Use marking allocation drop-down list.
This option only becomes available when the Use marking workflow setting has been enabled.
Common Module Settings
For more information visit the Common Module Settings article.
Restrict Access
The Restrict Access feature enables teachers to restrict the availability of any activity or even a course section according to certain conditions such as dates, grade obtained, group or activity completion. This is useful for make up tests, special projects, etc.
In this article, we will discuss the benefits of Access Restrictions, what activities and resources we can add Access Restriction to, the criteria based on which we can setup Access Restriction, and finally the step-by-step instructions on how to set it up.
Benefits of Access Restriction
- It allows the instructor to tailor the course to specific students' needs, making it more flexible and responsive.
- It allows the instructor to manage visibility of certain content of the course based on groups, which is useful in situations where the participants of a course are divided into groups (such as different tutorials).
What Activities/Resources can you utilize Access Restriction with?
All Activities and Resources implemented within eClass have a Restrict Access section in their settings, which allows the instructor to add Access Restrictions
What criteria can you setup Access Restriction based on?
Date - Prevent access until (or from) a specified date and time.
Grade - Require students to achieve a specified grade.
Group - Allow only students who belong to a specified group, or all groups.
User profile - Control access based on fields within the student's profile.
Restriction set - Add a set of nested restrictions to apply complex logic.
How to setup Access Restriction on an activity/resource (such as an assignment)
- Click the activity or resource on the course page, then click the Settings on the top menu bar of the activity/resource.

- Scroll down through the settings and click the Restrict Access section in order to expand it, as shown below:

- Click Add restriction... as shown below:

- Select the restriction(s) you are interested in - there can be more than one.

- In this example, I have selected User Profile, a very common user restriction setting.
 1) The options here are Must or Must not.. Must includes the parameters listed afterwards (they must be part of the restriction), while must not excludes them.
-
We can make a conditional OR statement, or an AND statement. By changing Any to All in the highlighted box above, we affect the conditions "or" and "and" indicated by the arrow. In this example, a student must match all of the following conditions - be in the time range entered AND have their first name contain "Mik". You can add more restrictions, and even nest them
To hide/show the restrictions on the course main page, see substep 4) on the 5th point above.
- Lastly click Save and Display at the bottom of the page.


Activity Completion
When enabled, completion tracking allows resources and activities to be marked as "completed" manually or when certain conditions have been met to help students manage their workloads.
- Set conditions for activity tracking as required. Refer to Using Activity completion for setting up tracking criteria.
Click Save and display.
Grading Assignments
For information on how to grade assignments visit this article