Scheduler is a tool that instructors can use to allow students to sign up for face-to-face appointments through eClass. Instructors can use this tool to set up consultations with students on individual assignments or for sign up for regular office hours. It can also be used as a sign-up tool for other activities, such as presentations.
It is also possible to add multiple Scheduler activities to your course. This might be particularly useful in cases where conferences are set up for specific purposes and students are required to sign up within a defined period of time, or for graded meetings. For example, you may have one Scheduler activity for regular office hours and another for consultations on research projects or for group projects.
Adding a Scheduler Activity
Follow these steps to add a Scheduler activity to your course.
- Click on Turn editing on button in the top right part of the course home page.

- Click Add an activity or resource link in the section where you would like the Scheduler to be listed.
- Select Scheduler in the pop-up (also listed under Activities tab), and then click Add. The Adding a new Scheduler page will appear.

Configuring a Scheduler Activity
Once on the Adding a New Scheduler page, several options are available to configure the activity to suit your needs. Click Expand all to reveal the options of each section.
General
- Enter the Scheduler title in the Name field. This name will appear as a link to access the Scheduler on the course main page. For example, you could enter the title Office Hours.
- Enter any relevant details or instructions in the Introduction text box. This is what students will see when they access the Scheduler.
The box can be expanded by clicking and dragging the bottom right corner outwards. To make more editing options available, click the
 button to expand the toolbar.
Options
- Enter an alternate Role name of the teacher if desired. This column heading appears at the top of the appointment list table for both instructors and students. If TAs will also be meeting with students, you could rename this to Teacher/TA.

- Select your preferred Mode for the Scheduler.
- Students can only register one appointment at a time will force students to wait until the date of any scheduled appointment has passed before scheduling a subsequent appointment.
- Students can only register one appointment will only allow students to sign up for one appointment.

-
Booking in groups allows students to book slot for all members of the group.
- Setting the Guard time will prevent students from changing the appointment before shortly before the set time. If the guard time is set to 2 hours, it will prevent students from changing their appointment within 2 hours of the appointment.

- Enter a number in minutes for the duration of the appointments in the Default slot duration. Note that you can customize individual slots once they have been created.

- Select yes from the Notifications drop-down if you would like email notifications and reminders to be sent to both students and instructors.

- If you want to make appointment notes visible to instructors and students or just the instructors, select appropriate option from Use notes for appointments drop-down list.

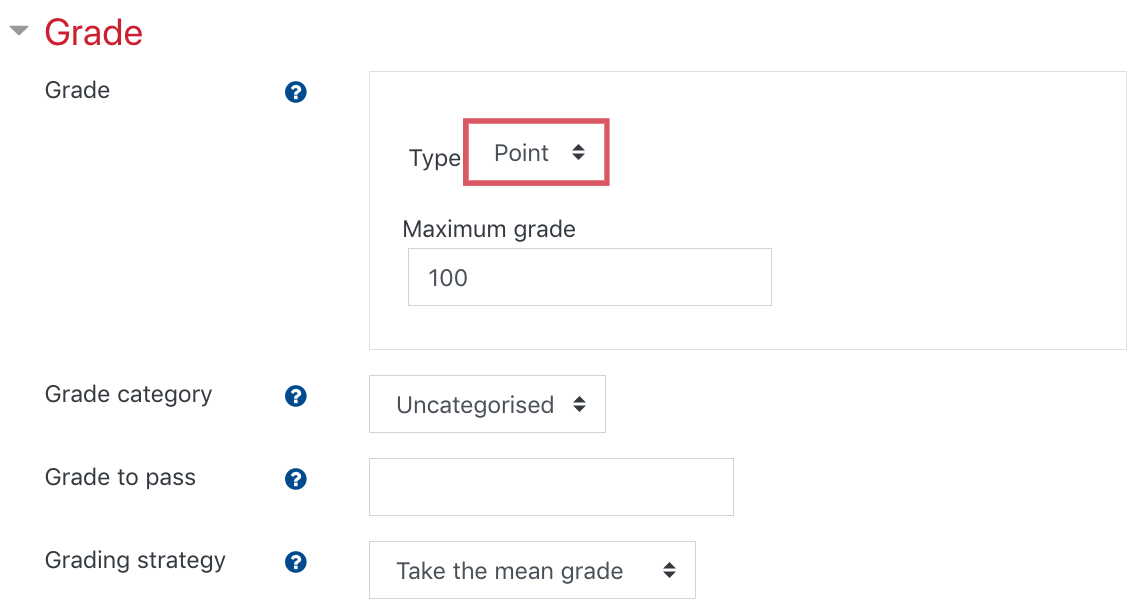
Grade
- If you plan to assign a grade for the appointment, select the maximum Grade from the drop-down. You will also need to select a Grading strategy if you are assigning grades.
Booking form and student-supplied data
- If you want students to see a separate booking screen to book their slot, set Use booking form to Yes.
- Enter text in the Booking instructions you want students to see before they make a booking. For example, it could be specific instructions such as the inclusion of the project name, brief synopsis for the meeting request, or extra information such as a student number.
- If Use booking form is enabled, you have the option to allow students to enter a message in a text box by setting Let students enter a message drop-down list to Yes.
- You can specify the number of files a student is able to upload along with their booking information by selecting a value in Maximum number of uploaded files drop-down list. If this value is set to 0, students will not see a file upload box. This becomes options unless File upload required is selected.
-
Maximum file size defines the maximum file size students are able to upload. This value cannot be greater than the course file size limit.

Common Module Settings
For more information visit the Common Module Settings article.
Restrict Access
Restrict access options allow you to set restrictions on an activity or resource by date & time, or by conditions related to previous activities.
- Set conditions for activity completion as required. Refer to Restricting access to resource and activity for setting up restriction criteria.
Adding Slots
Once the Scheduler has been created and the initial settings have been configured, you can begin adding slots for which students will be able to sign up from the My appointments page. You can add multiple sets of slots to one activity. For example, you can add slots for both the instructor and also the TAs. When booking appointments, a student will be able to identify which teacher or TA is assigned to the slot for which they are signing up.
You can add single slots or multiple slots at a time for repeating blocks of times.
Adding a Single Slot
- You can also use this procedure to record unscheduled appointments in order to have a record of the appointment and/or share any relevant comments with the student. Click Add slots followed by Add single slot on the My appointments page. The Add single slot page appears.

- Select the Date of the appointment from the drop-down lists.
- Enter the Duration of the slot in minutes.
- Conveniently, Scheduler will not create additional slots during times where you already have existing slots set up in the current or other courses. If you want to Ignore scheduling conflicts, click in the box to enable it. This is not recommended unless you are certain that you will be able to manage any overlapping appointments.
- Enter the Location of the appointment.
- Select the Teacher (or other role names you designated) who will be holding the appointment. You will have the option of selecting all eClass users assigned to the role of Instructor and Non-editing Instructor.
- Select a date from the drop-down lists that you would like to begin to Display the slot to students from. Prior to this date, students will not have the option to sign up for the session. The default is the current date.
- Check the Enable box to Email a reminder on, and select the date from the drop-down lists.
- If appropriate, enter a Comment that will appear in the What column of the Overview tab, which gives an overview of all appointments and what was discussed at each. This comment will also appear to the student after the session in addition to any other comments you make and the grade (where applicable). It is best-suited for a short description of the topic of the appointment.
 Image Caption
- If you are creating the slot for (a) specific student(s), you can assign them directly into the appointment by selecting their name from the Student drop-down list. If you are recording an appointment that has already taken place, you can mark the student as Seen and enter any Notes for the appointment to share with the student and for your own records.
- To assign multiple students to the slot, click Add another student button and repeat the instructions in the previous step.

Adding Repeated Slots
You can add slots that repeat every week on the same day(s) and for the same times, or create multiple slots for one day.
For example, if your office hours are every Tuesday and Thursday from 9AM to 10AM and Wednesday from 2PM to 3PM, you could create a set of slots for Tuesdays and Thursdays for the entire semester in one step. Slots for Wednesday would require a separate addition of slots since the available hours are at a different time.
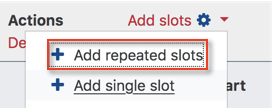
- You can also use this procedure to record unscheduled appointments in order to have a record of the appointment and/or share any relevant comments with the student. Click Add slots followed by Add repeated slots on the My appointments page. The Add repeated slots page appears.
- Select the Date of the first appointment slot from the drop-down lists.
- Select the date of the last day Repeat Time Slots Until from the drop-down lists.
- Select the day(s) on which slots will be created from the Add appointments on list.
- Select the Time range of your availability from the drop-down lists.
- Leave Divide into slots to Yes if you want the start and end time to be divided into equal time slots.If you selected yes, enter the Duration of each appointment slot in minutes and the number of minutes between each appointment in the Break between slots box.
- Conveniently, Scheduler will not create overlapping slots during times you already have existing slots set up in the current or other courses. However, if you want to ignore any scheduling conflicts, select Yes from the Force when overlap drop-down list. This is not recommended unless you are certain that you will be able to manage any overlapping appointments.
- Allowing multiple students per slot is not the same as allowing groups to sign up for a slot. Select the number of students allowed to sign up for a single appointment at a time from the Maximum number of students per slot.
- Enter the Location of the appointment.
- Select the Teacher (or other role names you designated) who will be holding the appointment. You will have the option of selecting all eClass users assigned to the role of Instructor and Non-editing Instructor.
- Select when you want to Display slot to students from the options in the drop-down list. Prior to the option selected, students will not have the option to sign up for the session. The default, now, enables students to see all available slots.
- Select when you want to Email a reminder for the appointment to students.
- Click Save changes to complete the process of adding the slots. The slots now appear on the My appointments page.

Managing Appointments
You can see all your available slots and appointments on the My appointments page. If you have added slots for another instructor or TA, you can view all slots from the All Appointments tab. From either page, you will be able to cancel existing appointments, delete slots, schedule appointments with individual students or a group, and send reminders to students who have not yet signed up for an appointment.
The list of slots appears in chronological order starting with slots on, or the first slots after, the current date. It includes the Date, Start and End Time, Location, the Student(s) signed up for the slot, the Teacher assigned to the particular slot (if applicable) and the Action columns. You will find four or five icons in the Action column with different functions as follows:

 allows you to delete the slot
 allows you to make a variety of changes to the slot including: changing the date and time (even after a student has signed up), changing the duration, assigning one or more students to the slot, and making any notes about the appointment after the fact
 limits the slot to one student (or one group, where groups are enabled). When clicked, it will toggle to
  , which opens the slot to unlimited students (and/or groups, where groups are enabled).
 allows you to revoke, or unassigned, the current student from the slot, leaving the slot open for other students. The revoke icon only appears when a slot is taken.
Deletion workaround
Delete

Scheduling a Student Appointment
Typically, students will be setting up their own appointments, but there may be occasions where it's necessary for the instructor to schedule an appointment with a student. For example, if the student wants to schedule an appointment outside of the available hours, an instructor can set up an alternate time.
Under the appointment table on the My appointments page is the Schedule by student table. This table lists students who have not yet signed up for an appointment. Note: this table will not appear if the number of students is more than 200.

- Click Schedule, followed by Schedule in a slot in the Action column next to the student's name and email address.

- If you are scheduling the student for an existing time slot, select the desired time slot from the Choose existing drop-down list. If you are rescheduling for a time outside of your posted hours, configure all the options in the Schedule a new slot box. Refer to 'Adding a single slot' documentation for more information on the options available.

- Click Save changes to finalize the appointment.
Scheduling a Group Appointment
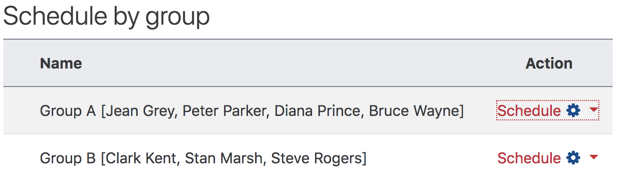
If you have enabled groups for the particular Scheduler activity instructors and students will be able to schedule group appointments. When a student signs up for a slot on behalf of the group, each group member's name will appear in the Student slot on the Teacher's My appointments page. All group members will receive an email alert and they will see the appointment when they access the related Scheduler activity from their respective eClass course pages.
Instructors will see the Schedule a Group table under the appointment list on the My appointments page. This table lists students who have not yet signed up for an appointment.
- Click Schedule, followed by Schedule in a slot in the Action column next to the group name with student's name in them.
- If you are scheduling the group for an existing time slot, select the desired time slot from the Choose existing drop-down list. If you are rescheduling for a time outside of your posted hours, configure all the options in the Schedule a new slot box. Refer to Adding a single slot for more information on the options available.
- Click Save changes to finalize the appointment.
Changing an Appointment
Although Scheduler should automatically notify students of changed or canceled appointments, it is recommended that instructors inform students of any changes to appointments. It is possible to change the time and/or date of an appointment to another existing slot or to a new time from the My appointments tab of the Scheduler activity.
- Click the change icon
 in the Actions column next to the appointment you would like to change.
 - Change the options as required.
- Click Save changes to finalize the appointment.
Cancelling an Appointment
There are two ways to cancel an appointment.
Cancelling an appointment and removing the time slot
In cases where you need to cancel the appointment, and you do not want other students to be able to reuse this time slot, click the Delete icon  .
.
In this scenario, you would most likely be canceling the appointment because you are no longer available at the specified time.
Cancelling an appointment and keeping the time slot open for other students
In cases where you want to cancel an appointment, but you want to leave the slot open for other students to reuse, click the Revoke icon  .
.
In this scenario, you are probably canceling the appointment because you or the student has decided it is no longer necessary to meet.
Recording Appointments
To record an appointment in Scheduler, you mark the student as "seen." However, before marking the student as seen, you may want to add comments for your records and/or a grade. Please note that students will not be able to see comments and the grade until the instructor marks the student as "seen."
- To make notes about the appointment, click the Change icon
 in the Action column next to the student's name.
 - If you do not check the Seen box, students will not be able to see their grade or the comments associated with the appointment. Click the Seen checkbox so that a checkmark appears in the box.
- Select a Grade from the drop-down list if you have enabled grades for the activity.
- Write any notes to share with the student in the Notes for the appointment box under his/her name. These may include a summary of the discussion, feedback for a particular assignment or specific tasks for the student.

- Click Save changes to finalize the record.