You can export an eClass Gradebook in several different file formats. You may wish to export your gradebook because:
- You may want to keep a personal record of your student grades outside of eClass for easy access later.
- It may assist you in managing your grades offline, and in your final grade submission to your department.
The most common format is an Excel spreadsheet. While exporting the Gradebook you can choose to export selective grade items (columns) or export all of them. Exported Gradebooks also include student information such as Student first name, last name, Student ID, and Student email.
A good practice is to first export the Gradebook once you have confirmed that students will no longer be added (after the cutoff) and when all grade item columns have been created. Once grades have been entered into the gradebook, you can then import the previously exported grades into eClass.
Important Note for Classes with Multiple Graders
If grading is distributed among several teachers or teaching assistants, and grades will be imported from several different files, be aware that incoming values will override existing grades.Therefore, if a file with a complete class list is used by each grader, but grades are entered for only some students, when the file is imported, the blank/empty cells will replace any grades that may already exist in the eClass Gradebook. The imported file supersedes any previous gradebook entries.
We recommend that graders remove the rows associated with students they will not be providing marks for so that the file contains only the students for which they will provide grades. This will make the importing of grades easier and safer.
Exporting a Gradebook
When exporting grades, it is important to ensure you choose the correct file format so that the application software you will use can recognize and open the exported file.
To export the Gradebook into and Excel file, follow these steps.
- Click Grades in the top row to launch the Gradebook. The Gradebook will display the Grader report on the View tab.

2. From the Grader Report menu select Export 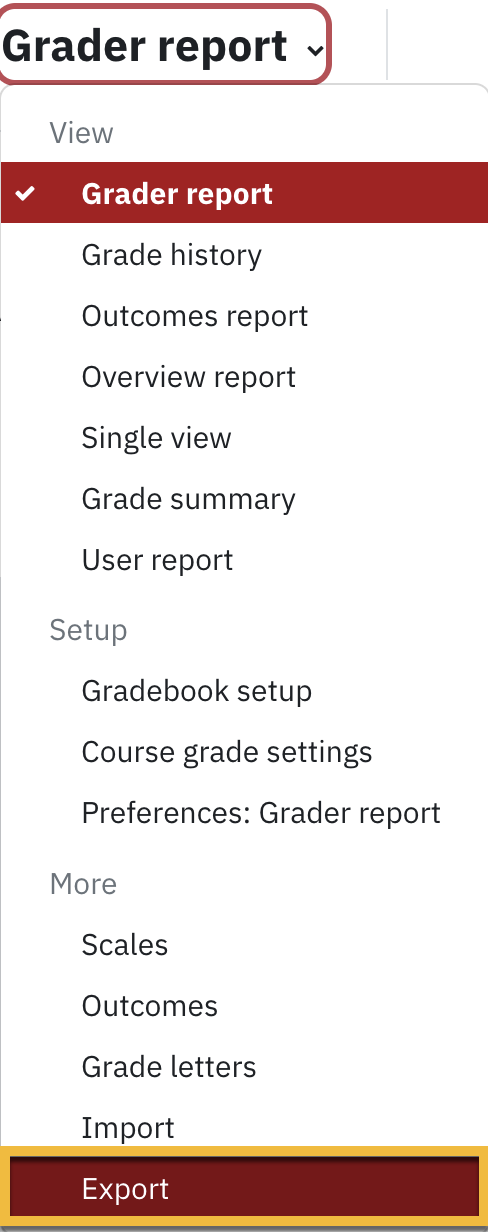
3. Click on the Export as drop-down menu to select:
- Open Document Spreadsheet – generic format that can be used by several spreadsheet software programs, but may have formatting issues when opened with Excel.
- Grades Input on the Web (GAM) format – allows you to export grades as a CSV file that can be used to upload your student grades to University's Grade Input on the Web (GAM) system.
- Plain Text File – Basic text file which can be opened by almost any text editor
- Excel Spreadsheet – The file format is specifically designed to work with different versions of Microsoft Excel.
-
XML – designed to work with software programs that recognize Web Standard data files. These include Web Browsers and many current desktop application software.

- Choose Excel spreadsheet. You can choose an appropriate alternative format to export gradebook if relevant.
- Select Grade items to be included. By default, all current grade items will be selected. Remove the check mark for those grade items you do not want exported.
- Export format options
-
Include feedback in export - allows you to export the feedback column for each item in addition to the grades columns.
-
Include feedback in export - allows you to export the feedback column for each item in addition to the grades columns.

7. Grade export display types - allows you choose numeric, percentage, letter grades. This may be useful if your department requires grades in one of these formats.
8. Click Download to save the Gradebook file to your computer. Depending on your browser configuration, you could be prompted to save the file in your Download folder or Desktop.
Importing a Gradebook
To facilitate the import process and ensure consistency between the import file and the eClass Gradebook, you should consider first exporting the eClass Gradebook before the grading process (as detailed above), so that the key student information is maintained as well as the grade items. The most common and preferred import methods are CSV files and paste from spreadsheet.
If you have not done so already, save your Excel file as a CSV file using the Save As option in Excel.
Importing a Gradebook using a CSV file
- Click Grades in the top row to launch the Gradebook. The Gradebook will display the Grader report on the View tab.
- From the Grader Report menu select Import. A tab for CSV format will open by default.

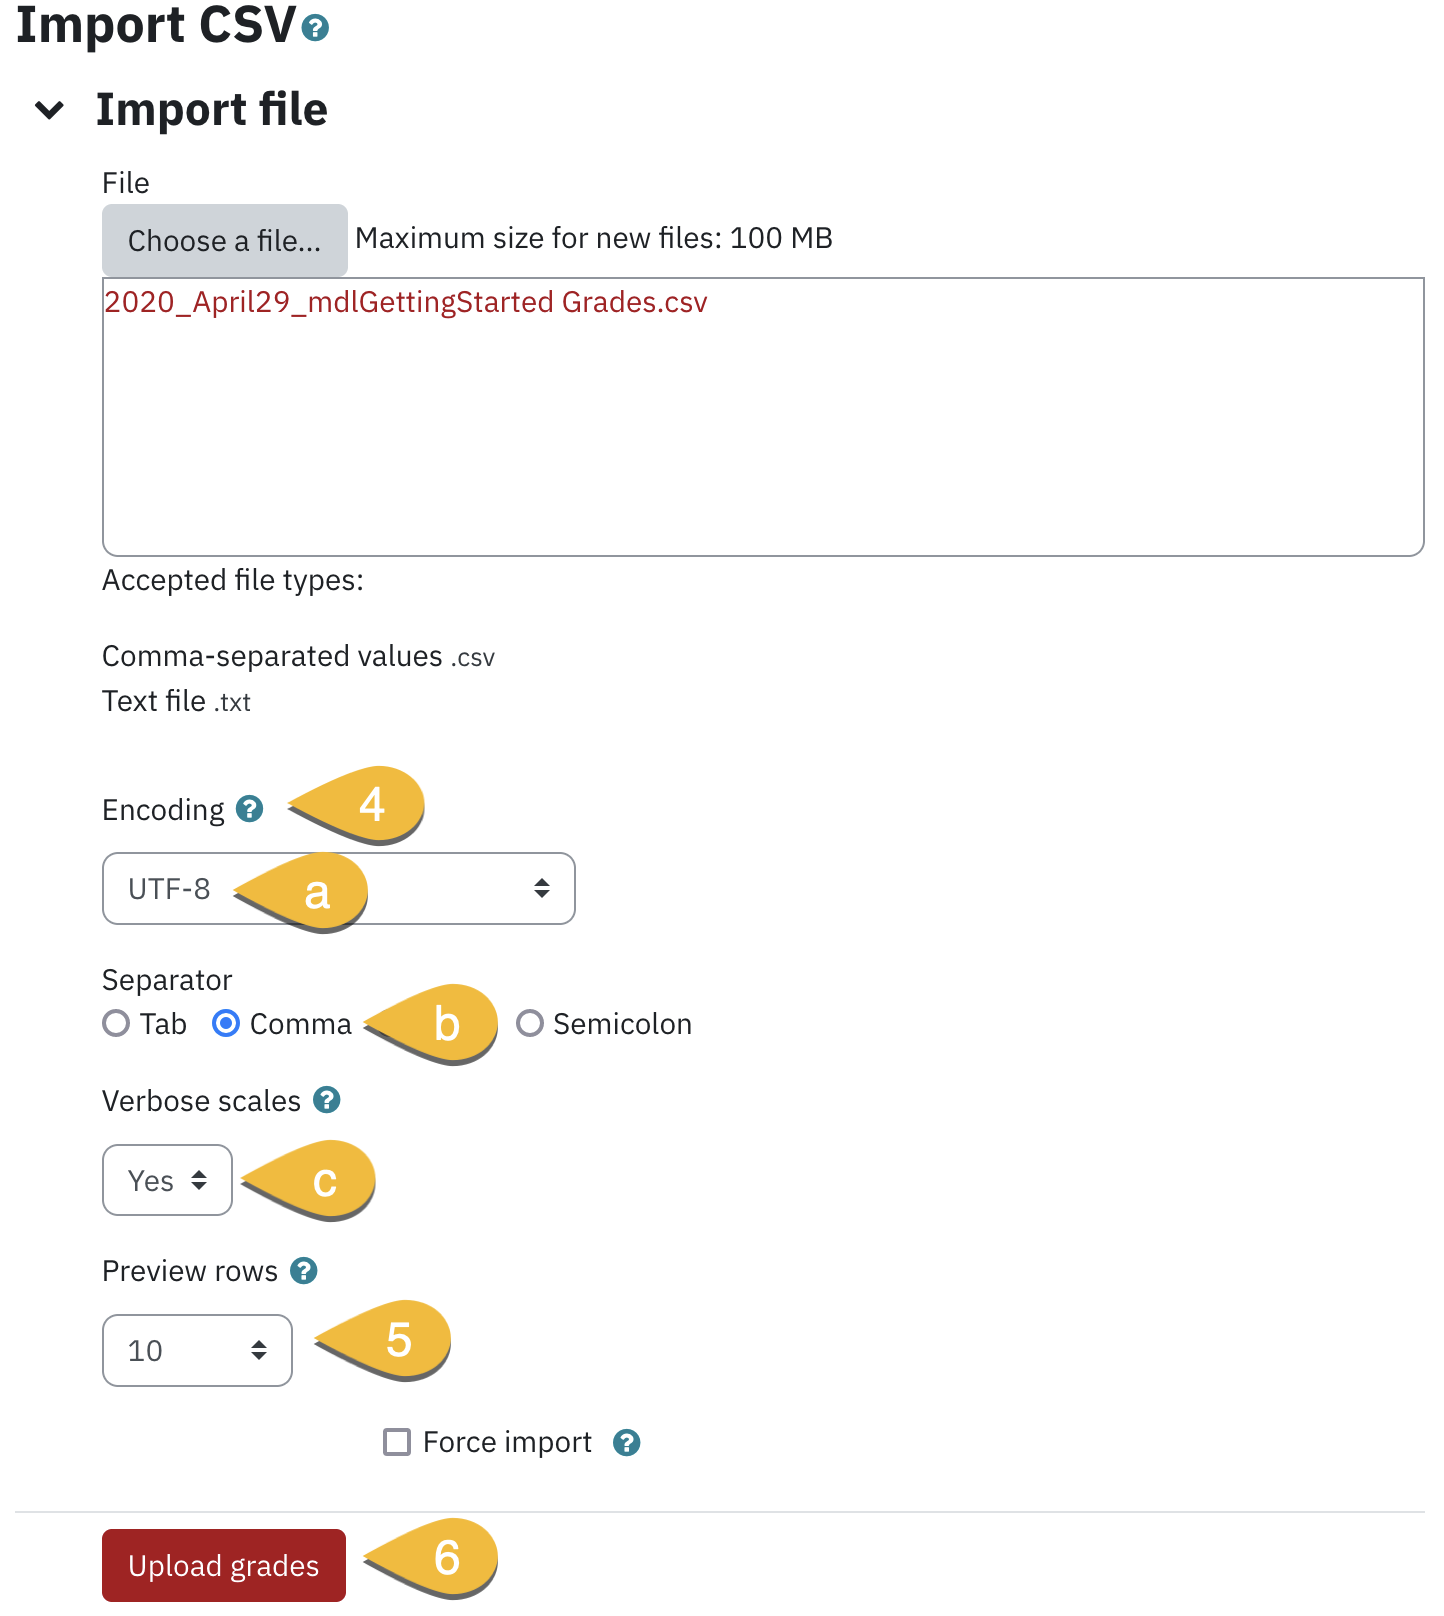
- Upload the file by either dragging and dropping the file into the area indicated by the blue arrow or by clicking Choose a file to select the file.
Ensure the file being imported is in CSV format.
- Confirm that the following options are set to the default:
- Encoding: UTF-8 (4a)
- Separator: Comma (4b)
- Verbose scales: Yes (4c)
- Select the number of rows to preview from Preview rows (5) prior to importing the file.
- Click Upload grades (6). An Import preview screen displays a sample of the incoming data. Depending on how many columns are being imported, some items may not be displayed.
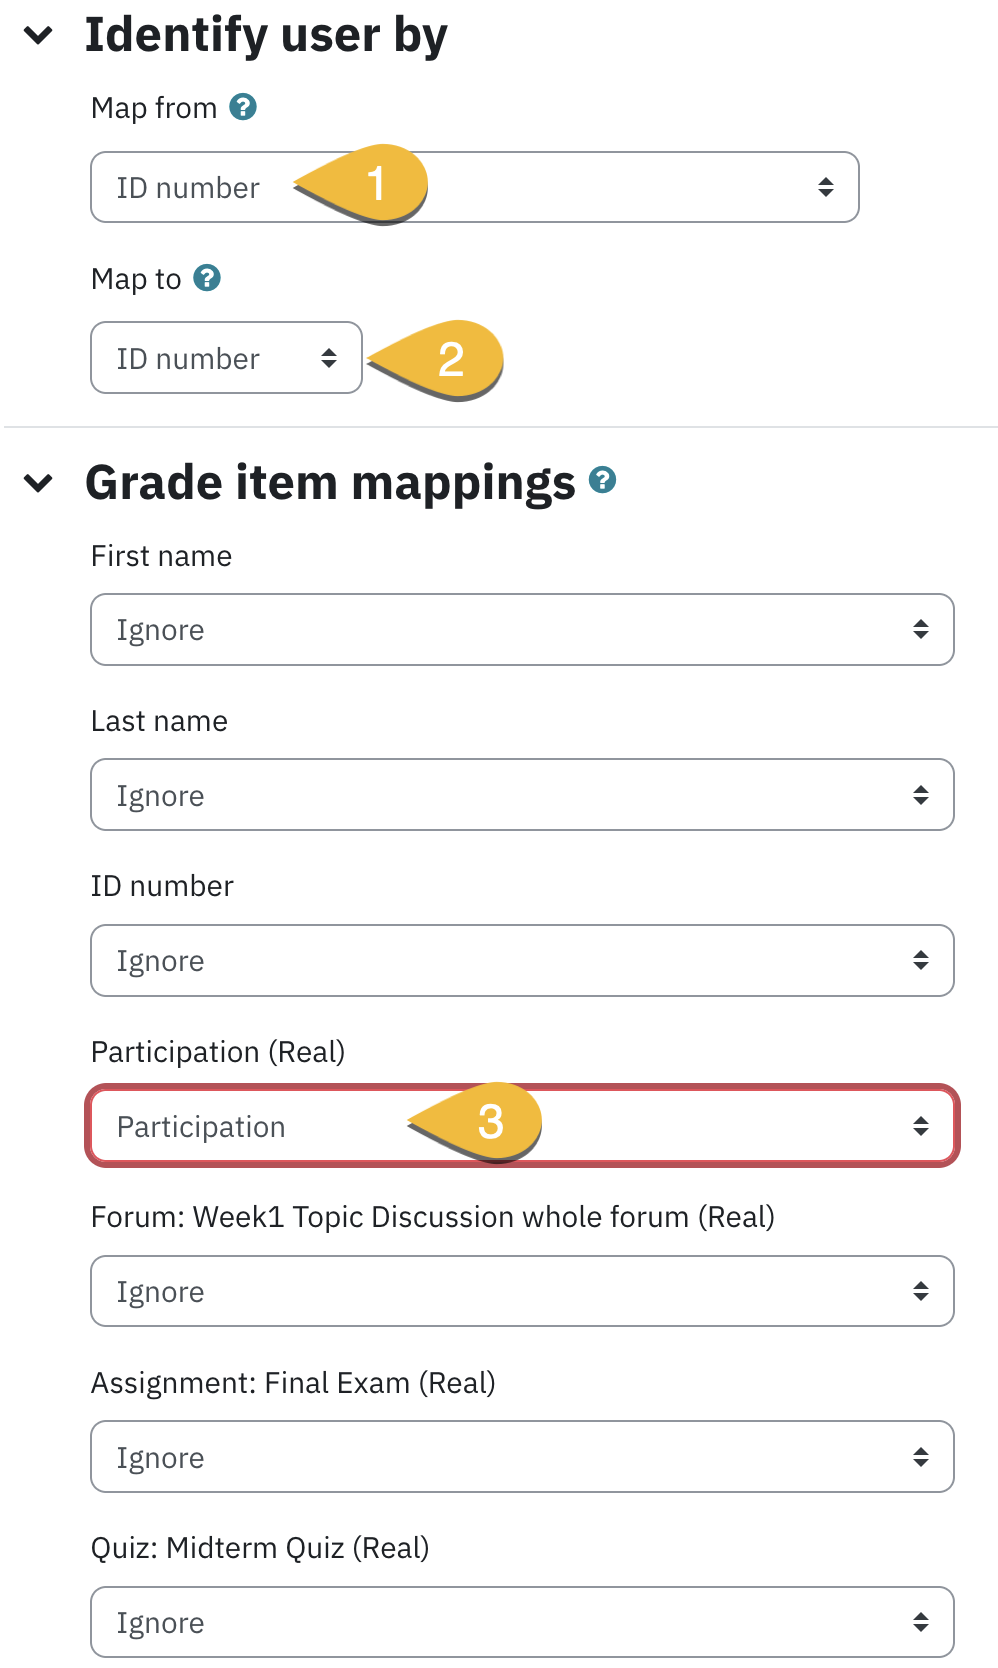
Identify Users
- Select ID number from the Map from drop-down.
- Select ID number from the Map to drop-down.
Grade Item Mapping
The activities listed on the left side are the column headings from your Excel (CSV) file, and the drop-down lists contain the Gradebook columns that currently exist in eClass.
- Please note Turnitin grades cannot be imported into eClass. If your CSV (comma separated values) file contains a grade column corresponding to a Turnitin Assignment, this will generate an error causing the import to fail. Identify how the grades you have entered should be mapped into the eClass Gradebook.
- Match the CSV file heading column on the left with the associated existing Gradebook column heading from the drop-down to list. Do this only for the grades you would like to import.
- Select New grade item if no column currently exists in the Gradebook for the associated column in your CSV file. This creates and populates the new column into eClass.
- Choose Ignore from the drop-down list for the column if you do not want to import grades from the CSV file.
- Match the CSV file heading column on the left with the associated existing Gradebook column heading from the drop-down to list. Do this only for the grades you would like to import.
- Click Upload grades. A message will appear indicating success or failure. Check the Gradebook and confirm that grades have been assigned to the correct students. The import process is complete.
Importing a Gradebook by pasting from spreadsheet method
Paste from spreadsheet feature utilizes uploading grades by copying and pasting from a spreadsheet such as Excel. Student and activity details in the spreadsheet must match what's already in the Gradebook.
- Click Grades in the top row to launch the Gradebook. The Gradebook will display the Grader report on the View tab.
- From the Grader report menu choose Import.
- Select Paste from spreadsheet from the Import as drop-down menu.

4. Copy and paste student and grade details from a spreadsheet to the Data field. Ensure student and grade details match what's already in the Gradebook. We recommend using ID Number to identify students and the activity name to identify grade items.
5. Confirm that the following options are set to the default:
- Encoding: UTF-8
- Verbose scales: Yes
6. Select the number of rows to preview from Preview rows prior to importing the file.
7. Click Upload grades. An Import preview screen displays a sample of the incoming data. Depending on how many columns are being imported, some items may not be displayed.

8. In the Identify user by section:
9. select ID number from the Map from drop-down.
10. Select ID number from the Map to drop-down.
11. In the Identify user by section, the activities listed on the left side are the column headings from your spreadsheet , and the drop-down lists contain the Gradebook columns that currently exist in eClass. Match the spreadsheet heading column on the left with the associated existing eClass Gradebook column heading from the drop-down to list.
12. Click Upload grades. A message will appear indicating success or failure. Check the Gradebook and confirm that grades have been assigned to the correct students. The import process is complete.